
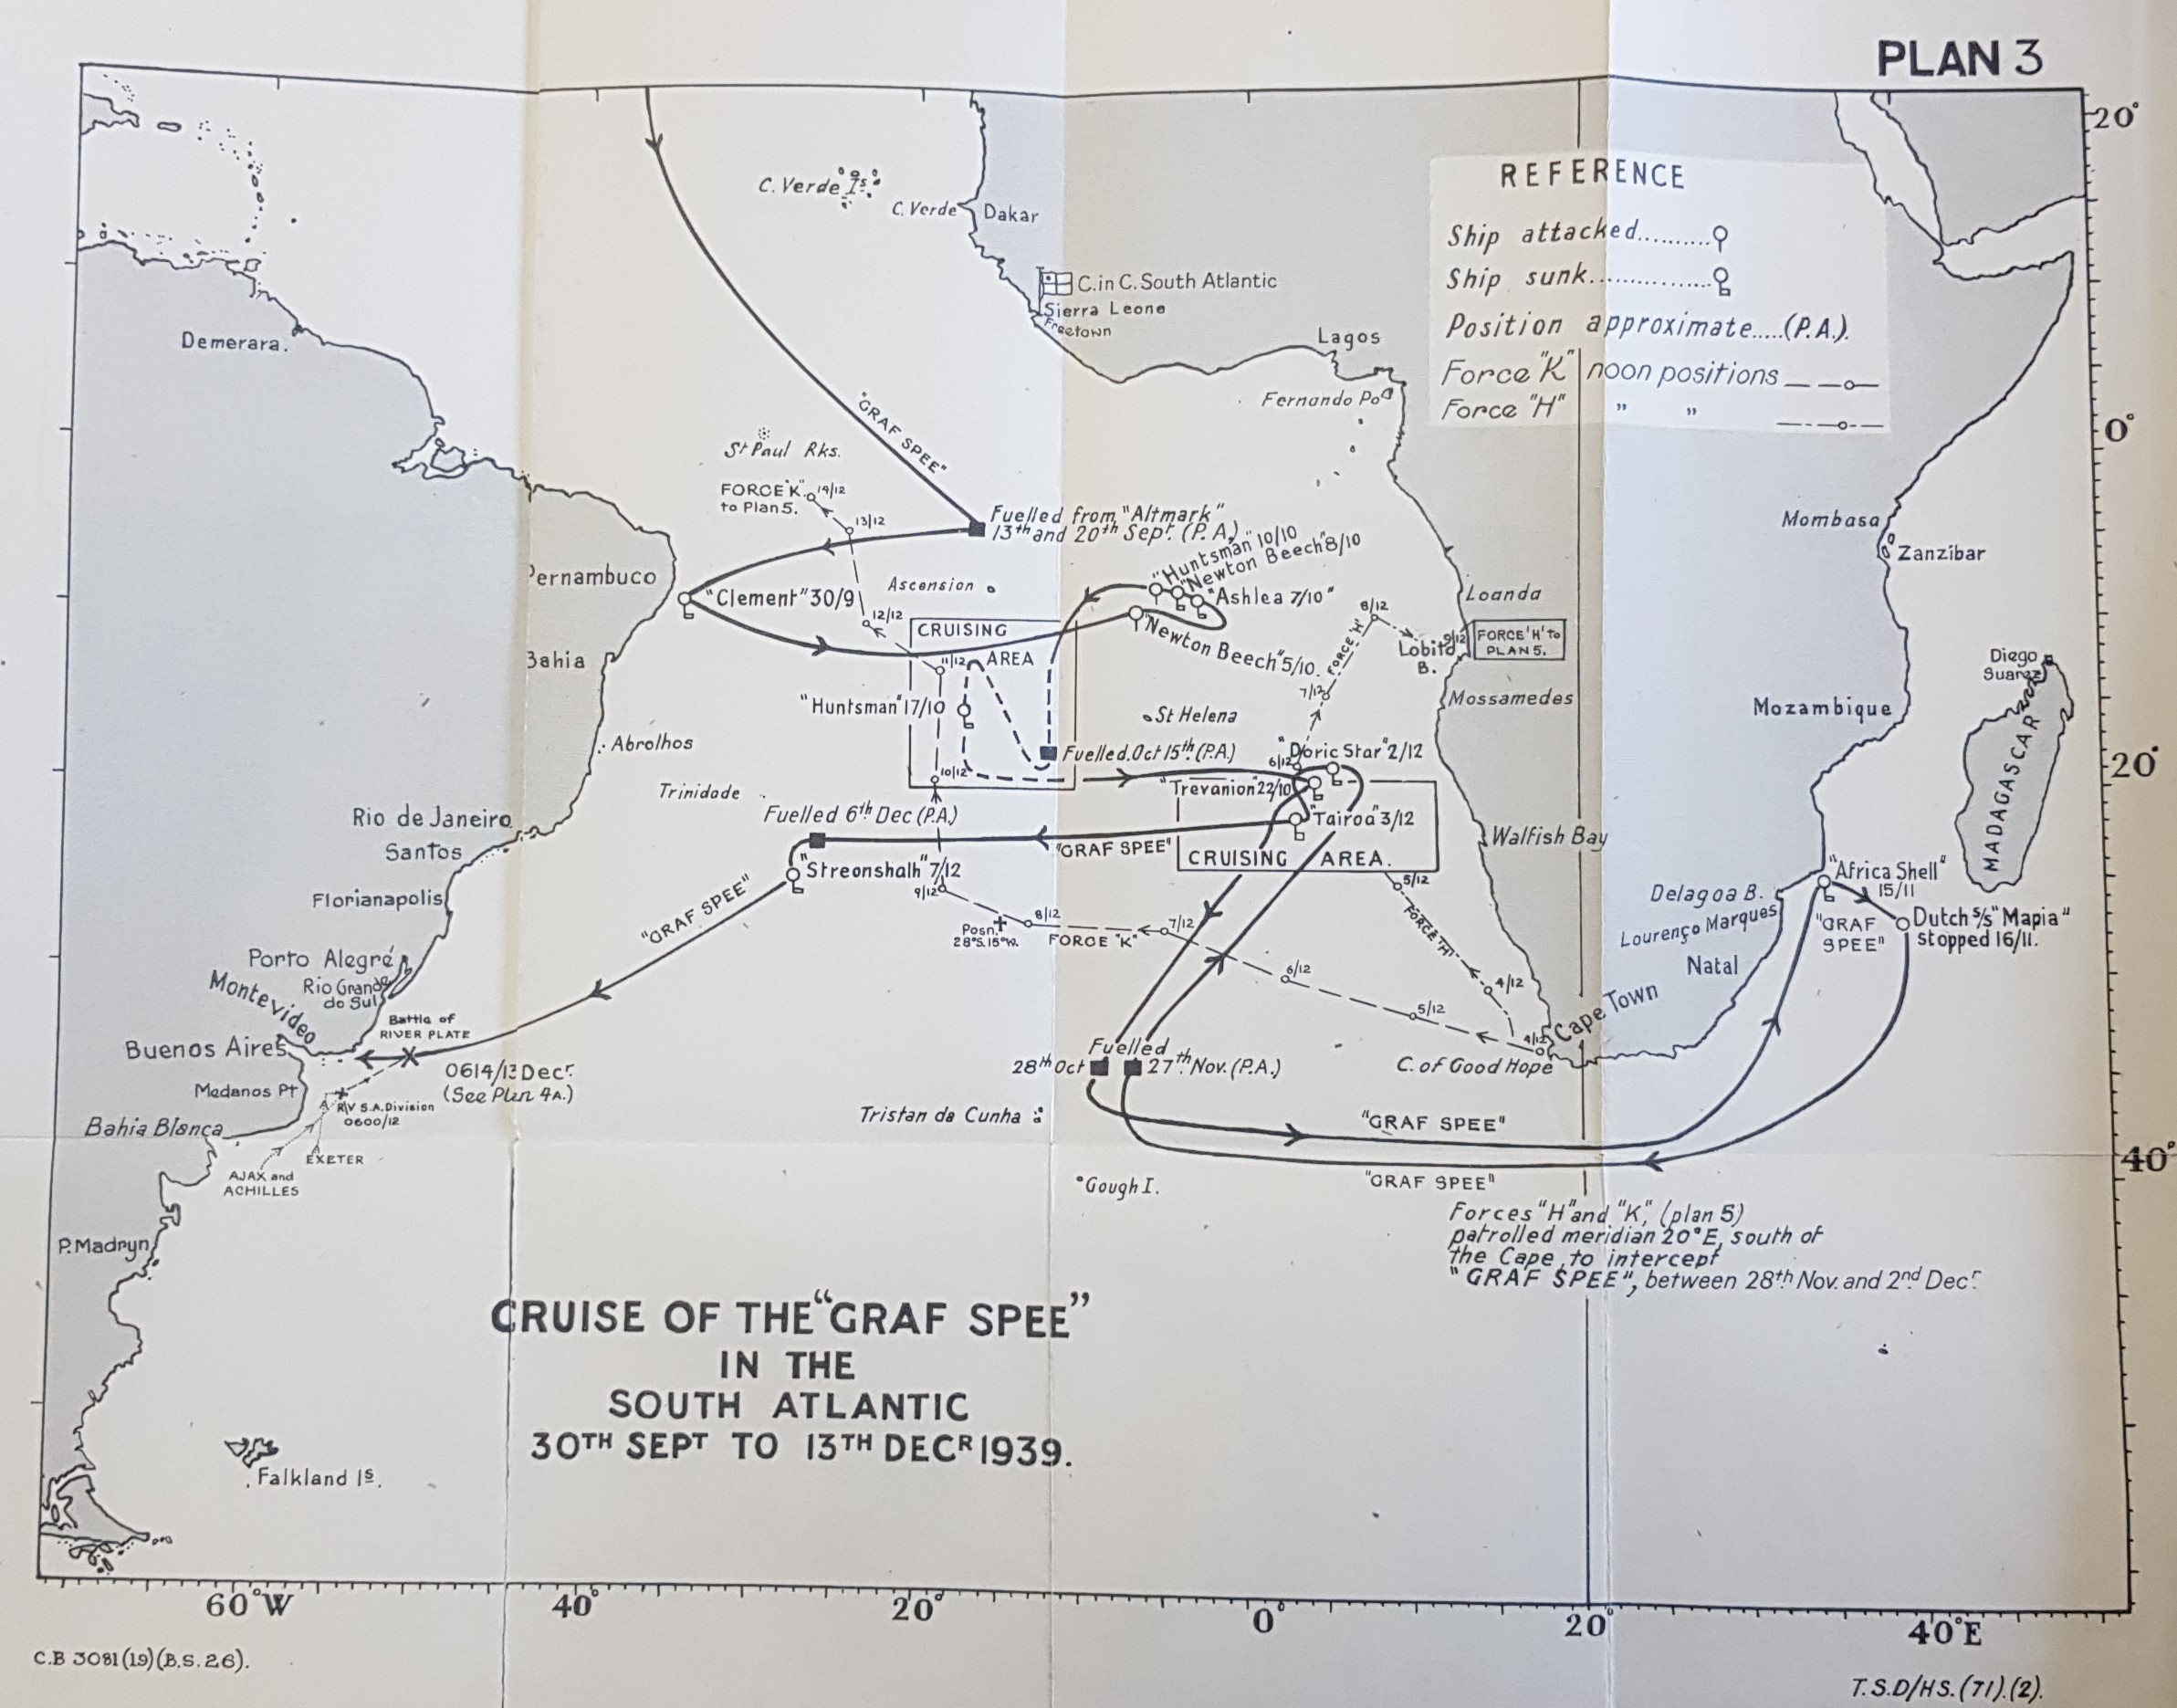
A chart provided from ADM 186/794
The problem for any raider is that every time it does its job, and takes out an enemy ship, it gives another marker to the enemy to help them locate it – the more it takes, the bigger its impact, but just as importantly the more the enemy knows. This was certainly the case for the Graf Spee and its cruise in the South Atlantic; the more success it had the more its hand was shown. In fact by the end the campaign the Royal Navy was anticipating where the Graf Spee was going and what Langsdorff’s plans were. This though was definitely not the case at the beginning when the RN knew the Graf Spee was not at home – but they had no idea where it was.
After leaving Wilhelmshaven on the 21st of August, the Graf Spee hugged the Norwegian coast up high into the North Atlantic, before turning west almost level with Iceland and then hugging the centre of the Atlantic all the way down to its waiting area – which it reached by the 12th of September. Over 11 days after war began, but 18 before he would take out the SS Clement on the 30th of September. For all this time there was no trace of them. Even though after making this strike Langsdorff was careful to cross to the other side of the Atlantic, for its next targets; after three more ships, he returned to his waiting area to throw off potential hunters. Langsdorff would constantly change area, change the time line, even change ocean – the only thing he did consistently was spend a lot of time avoiding the trade lanes where he might be spotted. This meant that he was less likely to be seen, but also less likely to see the potential targets he was theoretically hunting for.
The reality was that his operational plan was always as much about psychological impact as it was about real impact; this was the case for two reasons, such a wide are of operation was able to tie down even more of the RN, it also gave them a greater chance of survival. The latter was a very important criteria for the Reichsmarine as Hitler was very precious when it came to its larger ships – they were symbols of national pride, so their loss was something he sought to avoid. The former though was a critical criteria, especially when there would be allies were yet to enter the war – tying down RN assets as far away from what were regarded as the decisive theatre by the German High Command. The problem for Langsdorff though was that this criteria, along with the obvious need for high profile successes actually ended up making him predictable. It was this criteria which led the hunters too him – although he managed to keep them at bay for a long time; and it’s often portrayed as more of a guess by Commodore Harwood than a deduction.
Whether a guess or a deduction, it was actually not that big a leap. Mainly because thanks to one of Force G’s ships, HMS Cumberland, having already had a couple of close encounters with the Graf Spee, the most recently on the 11th of September when Graf Spee was exchanging supplies with the Altmark. They had escaped thanks to the early warning from one of her seaplanes, but still this had given Harwood an insight into the realities of Langsdorff’s operation. What it also shows is early on the respect the German’s had for the 8in guns of the RN’s heavy cruisers, on paper fighting the Cumberland should have at least been an option. As despite being a heavy cruiser, in fact County Class vessel, of the Kent Subclass, was eight years older, with a standard displacement a shade under 10,000tons & armed with eight BL 8in Mk VIII guns in four twin Mk I turrets (these were an interesting system which could almost qualify as ‘High Angle AA weapons’ themselves, as they had a maximum elevation of 70°… they were at times even used in this role to!). Furthermore, Cumberland had lost her traditional RN cruiser armament of eight 21in torpedoes in two quad mounts during her 1935 refit. This meant that in reality despite being arguably the most powerful unit of Harwood’s force, she was still on paper substantially weaker than the Graf Spee.
So why didn’t the Graf Spee just engage and swat away this weaker vessel? Well for two reasons, one in war there is no such thing as a sure thing, World War II would remind all powers of this on a regular occasions. Secondly, any damage she did receive could be critical and the only place she could get it repaired was nearly 10,000nm away in Germany. There were no safe spaces in the South Atlantic, something which got worse after the Declaration of Panama & the creation of the Pan-America Neutrality Zone – an area which theoretically ships of the warring powers couldn’t enter. In addition to all this any such action, any damage, would be bound to draw in more RN assets and as a solo vessel there was no chance of surviving in the face of that potential might.
If Cumberland was Harwood’s most powerful unit, then HMS Exeter a slightly modified York Class or Type B heavy cruiser was his confirmed second. Armed with six 8in guns in three twin mounts (a less capable turret, which hadn’t worked out as light as hoped and unable to achieve the 70°) and six 21in torpedoes in two triple mounts. Her standard displacement was again not far off 10,000tons, with a top speed of 32.25kts and a range of 10,000nmi at 14kts – Exeter had been designed for the trade protection mission. Although really her time in the South America Squadron and the South Atlantic Campaign would be the only time she would really be used as such. The force was rounded out by HMS(HMNZS) Achilles and HMS Ajax (flag ship), both Leander class light cruisers, both fitted with eight 6in guns in four twin mounts and eight 21in torpedoes in two quadruple mounts. Even at full load these light cruisers displaced just 9,740tons, but still had a top speed of 32.5kts, although a range of 5,730nmi at 13kts.
The advantage therefor for the RN’s cruisers was that they could outpace the Graf Spee, by 4 or more knots depending upon the state of repair of the engines. Furthermore its advantage in cruising range was more than offset by the Royal Fleet Auxiliary tankers, such as HMS Olynthus which supported Task Group G, and bases the RN maintained in the South Atlantic region. Even the Falkland Islands, which were for self-maintenance only, were a space that the Graf Spee could have only dreamed of having. This meant that the only real advantage that the Graf Spee had strategically, was the RN not knowing where it was and them having to defend trade everywhere because of that. Tactically though for any confrontation, her only advantage was range of armament and in theory at least armour.
It was with perhaps with all this in mind that Harwood’s aggressive tactics begin to make sense; combined with the traditional willingness of the RN to accept tactical losses for strategic advantages, the use of a ‘destroyer’ style operational manoeuvre was under such circumstances perfectly reasonable. It also adds to the reasoning that his knowledge of the Graf Spee’s abilities, actions indicating adverse feelings towards confrontation and Germany’s need for ‘status kills’ to make the most of any victories – the River Plate with its huge concentration of trade and distance from British bases, becomes the obvious final target to a ship wishing to head home in glory.
Bibliography
Clarke, A., 2014. Sverdlov Class Cruisers, and the Royal Navy’s Response. [Online]
Available at: https://globalmaritimehistory.com/sverdlov_class_rn_response/
[Accessed 11 February 2018].
Clarke, A., 2018. Royal Navy Cruisers (1): HMS Exeter, Atlantic to Asia!. [Online]
Available at: https://globalmaritimehistory.com/royal-navy-cruisers-1-hms-exeter-atlantic-asia/
[Accessed 30 March 2018].
Friedman, N., 2010. British Cruisers; Two World Wars and After. London: Seaforth Publishing.
Hore, P., 2018. Henry Harwood; Hero of the River Plate. Barnsley: Seaforth Publishing.
Konstam, A., 2015. Commonwealth Cruisers 1939-45. Oxford: Osprey Publishing Ltd.
Millington-Drake, E., 1965. The Drama of GrafSpee and the Battle of the Plate. London: Peter Davies.
Morris, D., 1987. Cruisers of the Royal and Commonwealth Navies. 1st ed. Liskeard: Maritime Books.
TNA – ADM 116/4109, 1940. Battle of the River Plate: reports from Admiral Commanding and from HM Ships Ajax, Achilles and Exeter.. London: United Kingdom National Archives (Kew).
TNA – ADM 116/4320, 1941. Battle of the River Plate: British views on German pocket battleship Admiral Graf Spee in Montevideo harbour; visits to South America by HMS Ajax and HMS Achilles. London: United Kingdom National Archives (Kew).
TNA – ADM 116/4470, 1940. Battle of the River Plate: messages and Foreign Office telegrams. London: United Kingdom National Archives (Kew).
TNA – ADM 186/794, 1944. Battle Summary No 26: The Chase & Destruction of the “Graff Spee” 1939. London: United Kingdon National Archives(Kew).
Whitley, M. J., 1996. Cruisers of World War Two; An International Encyclopedia. London: Arms and Armour Press.


